The purpose of this tutorial is to integrate Django-Sphinx inside your Django application to make use of the powerful Sphinx search engine.
This guide assumes the following:
- Python already installed
- Linux Ubuntu operating system
- Django already installed
- Eclipse — with Pydev — is the IDE
- You already have Djnago application to integrate Djnago-Sphinx with
- The Command Console is already opened!
- MySQL installed
Prepare for Sphinx Installation
- Install MySQL client development library, this is a pre-requisite to configure Sphinx with MySQL. Type the following in the Console:
sudo apt-get install libmysqlclient15-dev
- Install C++ compiler to compile Sphinx. Type the following in the Console:
sudo apt-get install g++
Install Shpinx
- Download the latest stable version of Sphinx (0.9.8.1) here
- Browse to your download folder. In my case I have downloaded the file in the default download file. You should type something similar in the Console:
cd /home/alaa/Downloads - Extract the file by typing the following in the Console:
tar xzvf sphinx-0.9.8.1.tar.gz
- Browse to the newly created folder:
cd sphinx-0.9.8.1 - Now it’s time to compile and install Sphinx, perform the following three commands in sequence:
sudo ./configure –with-prefix=/usr/local/sphinx
sudo make
sudo make install
Install Django-Sphinx
Django-Sphinx is a layer that functions much like the Django ORM does except it works on top of the Sphinx
- Open a new Console session
- Get and install Django-Sphinx project. Type the following in the Console in sequence:
svn checkout http://django-sphinx.googlecode.com/svn/trunk/ django-sphinx
cd django-sphinx
sudo python setup.py install
Configure Django
Django-Sphinx depends on Django global settings to generate the configuration file. Hence you need to do the following:
- Give your self full access on global_settings.py file. Type the following in the Console:
sudo chmod 777 /usr/lib/pymodules/python2.6/django/conf/global_settings.py
- Then open the global_settings.py file – as indicated in the previous step, it can be found at /usr/lib/pymodules/python2./django/conf/ – and fill values for the following variable with your MySQL settings:
- DATABASE_ENGINE = ‘mysql’
- DATABASE_NAME = ‘DB_NAME’ ### replace this with your DB name
- DATABASE_USER = ‘DB_USERNAME’ ### replace this with your DB username
- DATABASE_PASSWORD =’DB_PASSWORD’ ### replace this with your DB password
- DATABASE_HOST = ‘localhost’ ### replace this with your DB server
- DATABASE_PORT = ‘3306’ ### replace this if you have changed the default port


This step is very important to be able to generate sphinx configuration file from your Django models
Add Django-Sphinx to your project
- Browse to the folder where Django-Sphinx was installed. If you followed the previous steps it will be installed in your home folder.
- Copy the foloder djangosphinx to your project src folder
- Go to Eclipse, open your project or refresh it if already opened. The Project Explorer should look something like this:

- Open the application settings file and perform the following:
- Add djangoshpinx to the list of INSTALLED_APPS
- Add the following line at the end of the file
SPHINX_API_VERSION = 0x113


- Now open your application Models file
- Import SearchSphinx from djangosphinx
- Add new variable in the model of type SearchSphinx identifying the index name and the field weights


Configure and Run Sphinx
- Create a file called sphinx.conf on your project root (at the same level of the settings file)
- Click right-click on your project, select Django, the Custom Command
- Insert generate_sphinx_config then the application name that include the model where you have defined SearchSphinx. In my case the application name is search

- Copy the text appears on Eclipse Console and paste it in sphinx.conf

- Make sure that sql_query value appears on one line, not multiple
- To complete sphinx.conf file, copy and paste the following:
indexer
{
mem_limit = 32M
max_iops = 60
}
searchd
{
port = 3312
pid_file = /home/alaa/searchd.pid ### change ‘alaa’ with your username
} - Now, you’re ready to run Sphinx. on the Console, browse to the folder where shpinx.conf resides. In my case the command will be :
cd /workspace/quickJob/src/quickJob - Run the indexer, my indexer name is quick_job, so my command will be:
indexer quick_job
- Run Sphinx deamon by typing the following in the console:
searchd


Congratulations, Your Sphinx search engine is ready to accept queries.
Start Searching!
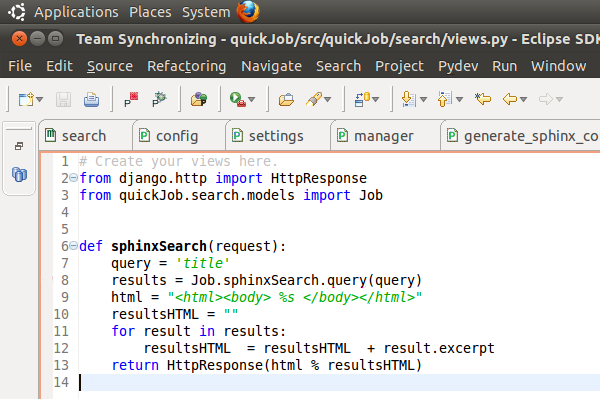
Now you can enjoy searching with Sphinx. Below is a simple example of for a view that performs search. for the sake of illustration, I consolidated the template inside the view.

This is not the end, there are still many powerful features in Sphinx and Django-Sphinx that you need to know more about.

[…] This post was mentioned on Twitter by Jordan Blogs, abuhijleh. abuhijleh said: GUIDE: Sphinx with Django: http://wp.me/pecFG-eA […]